
Elevate Your Game with Stunning Visual Effects in Roblox
- Primal Cam
- Jul 21, 2025
- 6 min read

Updated: Aug 4, 2025
You've built solid gameplay, but does your game truly pop?
Does landing a hit feel impactful?
Does a player leveling up feel rewarding?
Often, the difference between a good game and a great one lies in its visual effects (VFX).
These aren't just pretty embellishments; they are critical feedback mechanisms that communicate directly with your players, enhance immersion, and literally sell the moment.
The good news? You don't need to be a professional animator or 3D artist to create stunning VFX in Roblox. Roblox Studio provides powerful, accessible tools that, when used cleverly, can produce high-impact results.
Many developers, especially those focused on scripting or building, shy away from VFX, thinking it's too complex or requires specialized artistic talent. That's a myth we're about to debunk.
I’m Primal Cam, and today, we're diving into practical, high-impact VFX techniques for non-artists.
We'll master Roblox's built-in tools like Particle Emitters, explore how lighting and post-processing can elevate your scenes, and uncover clever tricks to make your visual effects truly immersive and memorable. Get ready to add that professional polish that keeps players coming back for more.

Why VFX Are More Than Just Eye Candy (They're Essential Gameplay Feedback!) 👀
Think about your favorite games. When you pick up an item, is there a sparkle? When you take damage, does the screen shake or flash? These subtle (or not-so-subtle) visual cues are VFX, and they serve vital functions:
Communication: They provide immediate, clear feedback to the player about game events (e.g., "You hit!", "You healed!", "That enemy is taking damage!").
Immersion: Well-placed VFX pull players deeper into the game world, making actions feel real and impactful.
Player Satisfaction: A powerful explosion or a satisfying hit effect makes gameplay feel more rewarding and fun.
Guidance: VFX can subtly direct player attention to objectives, interactable elements, or danger zones.
Monetization & Value: Premium items or abilities feel more valuable when they come with impressive visual flair.
Ignoring VFX is leaving a huge chunk of your game's potential untapped.
Your VFX Toolkit in Roblox Studio (No Art Degree Required!) 🎨
Roblox Studio offers robust features that, with a bit of experimentation and understanding, can yield fantastic visual results.
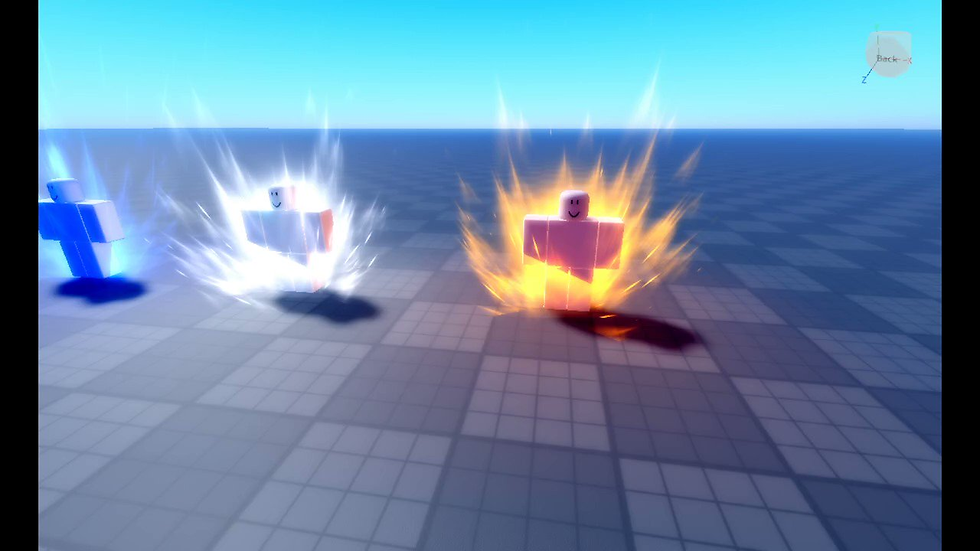
1. Particle Emitter Mastery: The Bread and Butter of VFX ✨
Particle Emitters are the single most versatile tool for VFX. They create streams of 2D images (particles) that can be customized to simulate everything from smoke and fire to magical spells and stylized explosions.
Key Properties to Master:
- Texture: This is crucial. Use .png images with transparent backgrounds. Simple shapes (circles, squares, soft blurs, stylized sparks) can create complex effects when combined. You can even find free particle textures online or create basic ones in paint programs.
- Rate: How many particles emit per second. High rates for dense smoke, low rates for subtle dust.
- Lifetime: How long each particle exists (e.g., 0.5 for a quick spark, 5 for lingering mist). You can use a range (e.g., 0.5, 1.5) for natural variation.
- Size: How big particles are. Often, you'll use a NumberSequence to make particles grow or shrink over their lifetime (e.g., start small, grow, then fade).
- Transparency: How opaque particles are. Again, NumberSequence is key to fading particles in/out to avoid harsh "pop" effects.
- Speed: How fast particles move away from the emitter.
- SpreadAngle: Controls how wide the cone of emission is (for cones/spheres).
- LightEmission: Makes particles glow (additive blending). Great for fire, energy, or magic.
- Color: Use a ColorSequence to make particles change color over their lifetime (e.g., white to orange to black for smoke).
Clever Tricks for Emitters:
- Layering: Combine multiple Particle Emitters on the same Attachment (or part). One for dense smoke, one for sparks, one for a subtle glow.
- Parent to Attachments: Attach Particle Emitters to Attachments on parts. This allows you to precisely control their position and rotation without affecting the parent part's physics.
- Orientation (Rotation): Rotate the parent Attachment to control the initial direction of particles, or use RotSpeed to make individual particles spin.
- Flipbooks (Advanced but Worth It): Use a single texture sheet containing multiple frames of an animation. Roblox can play through these frames to create animated particles (e.g., a cartoon explosion!).
2. Lighting & Post-Processing Hacks: Setting the Mood 💡
These effects apply globally or to specific areas, dramatically changing the visual feel of your game. They require no artistic skill, just tweaking properties.
Lighting Service Properties:
- Technology: Future is generally recommended for modern visuals, enabling advanced lighting features.
- Brightness, OutdoorAmbient, ColorShift_Top/Bottom: These control the overall light, shadows, and ambient colors. Experiment to set a mood (e.g., low Brightness and cool Ambient for a spooky scene).
- GlobalShadows: Toggle realistic shadows on/off.
Light Instances (PointLight, SpotLight, SurfaceLight):
- Add these to parts or attachments to create localized light sources.
- Hack: Combine a PointLight with a ParticleEmitter for a glowing fireball effect. The light will illuminate nearby surfaces, enhancing the VFX.
Post-Processing Effects (in Lighting or Camera): Add these objects directly under Lighting or a Camera object in the Explorer.
- BloomEffect: Exaggerates bright areas, making them glow. Perfect for energy blasts, light sources, or magical effects.
- ColorCorrectionEffect: Adjusts brightness, contrast, saturation, and tint. Use this to create specific moods (e.g., sepia for an old-timey feel, desaturated for a gritty look).
- BlurEffect: Applies a Gaussian blur. Great for blurring the background when a UI menu is open, or for a "drunken" effect.
- SunRaysEffect: Creates a halo of light around the sun.
- DepthOfFieldEffect: Blurs distant (or near) objects, simulating a camera lens. Great for focusing player attention.
Clever Tricks for Lighting & Post-Processing:
- Dynamic Lighting: Script changes to Brightness, ColorCorrection, or Bloom based on gameplay events (e.g., screen flashes red when low health, world gets darker when entering a dungeon).
- Local Moods: Use PointLights and SpotLights with specific colors and ranges to create different "mood zones" within your map.
3. Syncing VFX with Gameplay: The Impact Multiplier 💥
VFX are most effective when they respond directly to player actions and game events. This requires scripting.
Key Principles:
- Instant Feedback: VFX should happen immediately when an action occurs.
- Clear Communication: The VFX should visually explain what just happened.
- Performance Awareness: Client-side VFX are generally better for performance. The server tells the client what happened and where, and the client then plays the visual effect locally.
Common Syncing Methods:
- Client-Side Particle Spawns: Server fires a RemoteEvent to all nearby clients, telling them to play a specific particle effect at a given position (e.g., RemoteEvent:FireClient(player, "ExplosionVFX", position)).
- Property Tweens: Use TweenService to smoothly change properties of parts or lights (e.g., a part rapidly changes transparency to simulate fading, or a PointLight rapidly changes brightness for a flash).
- Camera Shakes: Small camera shakes (using Camera.CFrame) can add immense impact to explosions or heavy hits.
- UI Feedback: Combine UI elements with VFX (e.g., a damage number particle effect bursts from an enemy, or coins float up when collected).
Your VFX Action Plan for Impactful Games ✅
Don't feel overwhelmed. Start with simple effects and build up your skills:
Start with Particle Emitters: Experiment with all their properties. Learn to create basic smoke, sparks, and glow effects.
Enhance Key Moments: Identify 3-5 crucial moments in your game (e.g., player jumps, takes damage, opens a chest, a monster spawns) and try to add a simple, impactful VFX to each.
Play with Lighting: Adjust your Lighting service settings and add PointLights to key areas.
Experiment with Post-Processing: Add BloomEffect or ColorCorrectionEffect to your Lighting service and see how it changes the mood.
Watch & Learn: Analyze popular Roblox games. What kind of VFX do they use? How do they make them feel good? Try to replicate simple ones.
By integrating thoughtful visual effects into your Roblox game, you're not just making it look better; you're making it feel better. You're creating more satisfying gameplay loops and deepening player immersion, transforming your experience into a truly memorable one.
Ready to add that "wow" factor to your Roblox game with stunning visual effects?
🚀 Grab exclusive VFX templates, pre-made particle systems, and in-depth tutorials on my website now:
For a beginner's guide to creating particle effects in Roblox, watch Beginner's ROBLOX VFX Guide #1 - Particles (2025).

$50
Product Title
Product Details goes here with the simple product description and more information can be seen by clicking the see more button. Product Details goes here with the simple product description and more information can be seen by clicking the see more button

$50
Product Title
Product Details goes here with the simple product description and more information can be seen by clicking the see more button. Product Details goes here with the simple product description and more information can be seen by clicking the see more button.
$50
Product Title
Product Details goes here with the simple product description and more information can be seen by clicking the see more button. Product Details goes here with the simple product description and more information can be seen by clicking the see more button.

Comments