
The Ultimate Guide to Roblox Lighting: Transform Your Game's Visuals
- Primal Cam
- Aug 5, 2025
- 19 min read


Introduction: Why Lighting Matters in Roblox 🌟
You've spent hours, maybe even days or weeks, meticulously crafting your game's models, scripting intricate mechanics, and designing captivating levels. But have you ever felt like something was missing? Like your amazing creation just wasn't quite popping the way you imagined? The answer, my friend, often lies in the lighting.
Good lighting isn't just a fancy add-on; it's the invisible hand that shapes player perception. It can evoke emotions, from the eerie tension of a dimly lit horror scene to the joyful vibrancy of a sunny park. It can guide players through complex maps, highlighting objectives or hidden paths.
Most importantly, it elevates your game from a collection of parts to a cohesive, professional-looking world that truly draws players in.
Imagine walking into a room. The way it's lit immediately tells you something about its purpose and mood, right? Is it bright and inviting? Dark and mysterious? The same principle applies to your Roblox game. (The Ultimate Guide to Roblox Lighting)
By mastering lighting, you're not just making things brighter; you're setting a mood, telling a story, and creating a more polished, memorable aesthetic that will keep players coming back for more. Let's light up your development journey! 🚀
Understanding Roblox Lighting: The Basics 💡
At the heart of all visual magic in Roblox Studio lies the Lighting service. You'll find it nestled comfortably in your Explorer window, usually right under Workspace. This service is your central hub for controlling the overall look and feel of your game's environment.
Think of it as your game's personal sun, moon, and atmosphere controller, all rolled into one powerful tool.
When you select the Lighting service in the Explorer, you'll see a plethora of properties appear in the Properties window. These are your dials and sliders for shaping the world's illumination. Let's break down some of the fundamental properties you'll encounter here:
Brightness: This is your master switch for the overall light intensity in your game. A higher value makes everything brighter, while a lower value plunges your world into darkness. You'll use this to establish the base illumination.
Ambient: Imagine light that bounces around everywhere, filling in shadows and giving objects a general glow. That's Ambient light. It's uniform and comes from all directions, preventing areas from being completely black. You can adjust its color to tint the overall environment.
OutdoorAmbient: Similar to Ambient, but specifically for outdoor areas, simulating the light from the sky. This works hand-in-hand with Ambient to create realistic outdoor scenes. You'll often want this to be a light blue or gray for a natural sky effect.
GeographicLatitude: This property influences the angle of the sun and moon based on a simulated geographical location. While you might not tweak this often, it subtly affects the sun's path and the length of shadows throughout the day.
ClockTime / TimeOfDay: These are crucial for controlling the time of day in your game.
ClockTime uses a 24-hour format (e.g., 0 for midnight, 12 for noon, 18 for 6 PM).
TimeOfDay is a string representation (e.g., "12:00:00").
You can use these to create dynamic day-night cycles, which we'll explore more later! ⏰
FogEnd, FogStart, FogColor: These properties allow you to add atmospheric fog to your game.
FogEnd is the distance from the camera where the fog is fully opaque.
FogStart is where the fog begins to appear.
FogColor determines the color of the fog.
You can use fog to create a sense of depth, mystery, or even to hide distant, less detailed areas for performance! 🌫️
While these properties give you a good starting point, the most impactful property in the Lighting service, the one that truly defines the visual fidelity of your game, is Technology.
This single property dictates how light interacts with your world, how shadows are rendered, and the overall realism you can achieve. Let's dive into the three main lighting technologies Roblox offers, and you'll see why choosing the right one is so important for your vision!
The Evolution of Light: Voxel, ShadowMap, and Future Is Bright (FiB) 🌅
Roblox has continuously evolved its lighting capabilities, offering you more powerful and realistic options over time. Understanding these different "lighting technologies" is crucial because each has its own strengths, weaknesses, and ideal use cases. You'll find the Technology property within the Lighting service, and it offers three main choices: Voxel, ShadowMap, and Future Is Bright (FiB).
Let's break down each one so you can make an informed decision for your game!
1. Voxel: The Classic, Performance-Friendly Choice 🧱
What it is:
Voxel lighting is the oldest and simplest lighting technology in Roblox. When you select "Voxel" for your Technology property, Roblox essentially divides your game world into a grid of tiny cubes, or "voxels." Light then propagates through these voxels. It's a bit like how old pixel art games rendered their graphics, but in 3D. Shadows are calculated based on whether a voxel is occupied or not, leading to a blocky, less refined appearance.
How it works:
Imagine a light source. In Voxel lighting, this light "shines" through the grid. If a voxel is blocked by another part, it casts a shadow in the voxels behind it. This method is very efficient because it doesn't require complex calculations for every single pixel or surface.
Pros: 👍
Excellent Performance: This is Voxel's biggest strength. Because it's so computationally light, games using Voxel lighting run incredibly smoothly, even on older devices or low-end mobile phones. If you're targeting a broad audience, especially those with less powerful hardware, Voxel is a solid choice.
Fast Loading Times: Less complex lighting calculations mean your game loads faster, getting players into the action quicker.
Simpler Development: For developers just starting out, Voxel lighting is easier to grasp and doesn't require as much fine-tuning to look decent.
Cons: 👎
Blocky Shadows: The most noticeable drawback is the pixelated, blocky nature of shadows. They lack smooth edges and don't accurately reflect the shape of the objects casting them.
Less Realistic: Overall, Voxel lighting provides a less realistic and more "cartoony" or "retro" look. There's no global illumination or advanced effects.
Limited Visual Fidelity: You won't achieve the same level of visual depth or immersion as with the more advanced technologies.
When to use it: 🎯
You should consider Voxel lighting if:
Your primary concern is performance and broad accessibility.
You're building a simple, stylized, or retro-themed game where a less realistic look is actually desired.
Your game is designed for mobile-first experiences where every frame counts.
You're just starting out and want to focus on gameplay mechanics before diving into advanced visuals.
2. ShadowMap: A Step Up in Realism 🌓
What it is:
ShadowMap lighting is a significant improvement over Voxel, offering much more realistic and smoother shadows. Instead of a voxel grid, ShadowMap uses a technique where the scene is rendered from the perspective of each light source. This "shadow map" then tells the game which areas are in shadow and which are lit.
How it works:
Think of it like this: for every light source (like the sun or a spotlight), Roblox takes a picture of the scene from that light's point of view. Anything visible in that picture is lit, and anything hidden behind an object is in shadow. These shadow maps are then projected onto the scene, creating more accurate and less blocky shadows than Voxel.
Pros: 👍
Smoother, More Realistic Shadows: This is the key advantage. Shadows have softer edges and accurately reflect the shape of the objects casting them, greatly enhancing visual quality.
Better Balance: ShadowMap strikes a good balance between visual fidelity and performance. It looks much better than Voxel without being as demanding as FiB.
Improved Depth Perception: More accurate shadows help you perceive depth and spatial relationships within your game world more clearly.
Cons: 👎
Still Has Limitations: While better, ShadowMap shadows aren't perfectly dynamic or fully realistic. They can sometimes appear jagged or "pixelated" at certain angles, especially for very thin objects.
No Global Illumination: Light doesn't bounce off surfaces and illuminate other areas (a concept called global illumination). This means shadows can still look a bit too dark or flat.
More Demanding than Voxel: It requires more computational power than Voxel, so it might not be ideal for the absolute lowest-end devices.
When to use it: 🎯
You should consider ShadowMap lighting if:
You want a significant visual upgrade from Voxel without completely sacrificing performance.
Your game requires decently realistic shadows for immersion (e.g., adventure games, simulators).
You're targeting a mid-range audience with moderately powerful devices.
You want to create a more polished and modern look than Voxel can offer.
3. Future Is Bright (FiB): The Pinnacle of Realism ☀️
What it is:
Future Is Bright, often affectionately called "FiB," is Roblox's most advanced and visually stunning lighting technology. It brings physically-based rendering (PBR) and global illumination (GI) to your games, creating incredibly realistic light interactions, dynamic shadows, and vibrant reflections. FiB is designed to mimic how light behaves in the real world.
How it works:
Physically-Based Rendering (PBR): This means that materials in your game react to light in a more realistic way. Metals will reflect light differently than wood or fabric, based on their physical properties.
Global Illumination (GI): This is the magic sauce! Instead of just direct light, FiB calculates how light bounces off surfaces and illuminates other parts of the scene. For example, if you have a bright red wall, some of that red light will subtly tint nearby white walls. This creates incredibly soft, natural-looking lighting and fills in shadows beautifully.
Dynamic Shadows: Shadows are incredibly smooth, accurate, and react in real-time to light sources and moving objects.
Volumetric Lighting: Allows for effects like light rays passing through fog or dust, creating stunning atmospheric visuals.
Pros: 👍
Stunning Visuals: FiB delivers the most immersive and professional-looking graphics currently possible in Roblox. Your game will look truly next-gen.
Incredibly Realistic Light and Shadows: Global illumination and dynamic shadows create a sense of depth and realism that is unmatched by the other technologies.
Enhanced Immersion: Players will feel more connected to your world when the lighting is so believable and dynamic.
PBR Material Support: Fully leverages the power of PBR materials, making your textures and models look incredibly detailed and reactive to light.
Cons: 👎
Performance Intensive: This is FiB's main drawback. It requires significant computational power, meaning it might struggle on older devices or lower-end mobile phones. You'll need to optimize your game carefully.
Higher System Requirements: To experience FiB at its best, players need a relatively modern PC or device.
Can Be Tricky to Master: Achieving the perfect look with FiB often requires more experimentation and understanding of lighting principles. You might need to adjust more properties and effects to get the desired result.
When to use it: 🎯
You should absolutely consider Future Is Bright if:
Your top priority is cutting-edge visual fidelity and realism.
You want to create a highly immersive and atmospheric game (e.g., showcase builds, horror games, detailed simulators, open-world adventures).
You're targeting an audience with modern gaming hardware.
You're willing to invest time in optimizing your game to ensure smooth performance with FiB.
Comparative Overview: Choosing Your Technology 📊
Here's a quick summary to help you decide which lighting technology is right for your project:
Feature | Voxel | ShadowMap | Future Is Bright (FiB) |
Realism | Low (blocky, stylized) | Medium (smoother shadows) | High (PBR, GI, dynamic shadows) |
Performance | Excellent (very fast) | Good (balanced) | Demanding (requires modern hardware) |
Shadow Quality | Blocky, pixelated | Smooth, accurate | Ultra-smooth, dynamic, realistic |
Global Illumination | No | No | Yes |
Target Audience | Low-end devices, mobile, stylized games | Mid-range devices, general games | High-end devices, visually-driven games |
Complexity | Simple | Moderate | Advanced |
You can even switch between these technologies in Studio to see the immediate impact on your game! Experimentation is key to finding the perfect balance for your unique vision. 🧪
Mastering the Mood: Lighting Properties and Effects ✨
Now that you understand the different lighting technologies, let's get hands-on! You're going to learn how to manipulate the various properties and add special effects to create the exact mood and atmosphere you envision for your game. All of these settings are found within the Lighting service in your Explorer window.
1. Controlling the Time of Day ⏰
One of the most fundamental ways to set a mood is by controlling the time of day. Roblox makes this incredibly easy for you.
ClockTime (Number): This property uses a 24-hour format.
0 or 24 is midnight 🌃
6 is sunrise 🌅
12 is noon ☀️
18 is sunset 🌇
You can simply type a number between 0 and 24 into this property.
TimeOfDay (String): This is a string representation, like "06:00:00" for 6 AM. Changing ClockTime will automatically update TimeOfDay, and vice-versa.
Creating a Day-Night Cycle (Scripting!):
To make your game's time flow dynamically, you'll need a simple script. You can place a Script in ServerScriptService and add code like this:
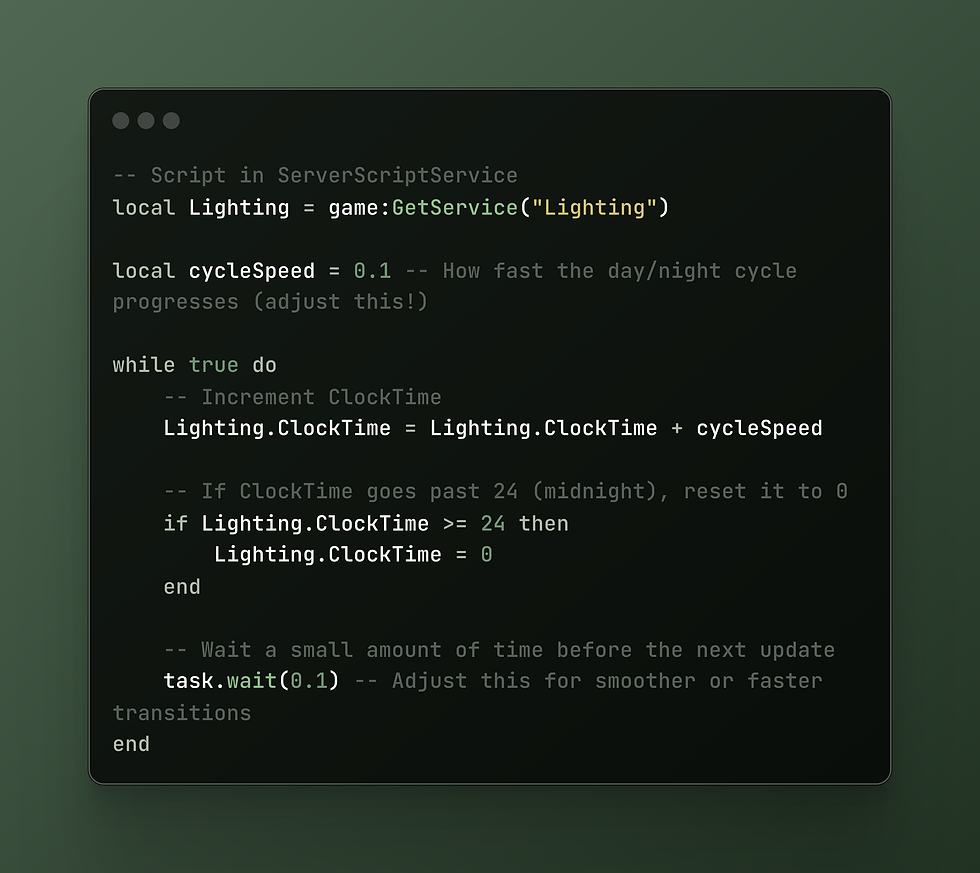
You can adjust cycleSpeed and the task.wait() duration to make your day-night cycle as fast or as slow as you like! Imagine the sun rising over your landscape, casting long shadows, and then slowly setting into a beautiful twilight. ✨
2. Core Color Properties: Shaping the Ambiance 🎨
Beyond just brightness, the color of your light sources dramatically impacts the feel of your game.
Brightness: We touched on this, but remember it's your overall intensity. For a dark, moody game, you'll want a lower brightness. For a bright, cheerful game, a higher one.
Ambient (Color3): This controls the color of the ambient light that fills in all areas.
A slightly dark blue or grey for a natural, subtle fill.
A warm orange for an indoor, cozy feel.
A deep purple for an alien or mysterious atmosphere.
Experiment with this to prevent harsh, completely black shadows.
OutdoorAmbient (Color3): This specifically affects the ambient light coming from the sky.
A light blue is standard for a clear day.
A darker, desaturated blue for an overcast or stormy sky.
A warm orange/red during sunrise or sunset.
This works in tandem with Ambient to define your exterior lighting.
3. Atmospheric Effects: Adding Depth and Mystery 🌫️
Roblox provides several powerful post-processing effects that you can add directly under the Lighting service. These effects are like filters applied to your entire game world, dramatically altering its visual style.
To add these, select the Lighting service in the Explorer, click the + icon, and search for the desired effect.
a. ColorCorrectionEffect 🌈
This is your go-to for applying a global color filter to your game. It's like Instagram for your Roblox world!
Brightness: Adjusts the overall brightness after other lighting calculations.
Contrast: Controls the difference between the light and dark areas. Higher contrast makes colors pop, lower contrast makes them softer.
Saturation: Determines the intensity of colors. High saturation makes colors vibrant, low saturation makes them desaturated (closer to grayscale).
TintColor: Applies a universal color overlay to your entire scene.
A warm yellow/orange TintColor can give your game a cozy, golden hour feel.
A cool blue TintColor can make it feel cold, eerie, or futuristic.
A sepia TintColor for a vintage look.
You can use ColorCorrectionEffect to:
Create a desaturated, gritty look for a post-apocalyptic game.
Boost saturation for a vibrant, cartoonish style.
Apply a subtle blue tint for a chilly, winter wonderland.
b. BloomEffect ✨
Want your lights to glow? Want emissive materials to truly radiate? BloomEffect is your answer! It simulates the effect of light bleeding onto surrounding areas, creating a soft, luminous halo around bright objects.
Intensity: How strong the bloom effect is. Higher values mean more glow.
Size: How far the bloom spreads from the light source.
Threshold: The minimum brightness a pixel needs to have before it starts blooming. Lowering this makes more things glow.
You can use BloomEffect to:
Make neon signs truly pop in a city at night.
Create glowing magical effects for spells or enchanted items.
Add a soft aura around light fixtures or futuristic technology.
Give your game a dreamy, ethereal feel.
c. SunRaysEffect ☀️
This effect adds beautiful, volumetric light rays that appear to stream from the sun, especially noticeable when the sun is low in the sky or partially obscured by objects. It adds a fantastic sense of atmosphere and realism.
Intensity: How strong and visible the sun rays are.
Spread: How wide the sun rays fan out.
You can use SunRaysEffect to:
Create stunning sunrises and sunsets.
Add a cinematic touch to outdoor scenes.
Enhance the feeling of a vast, open world.
d. DepthOfField 📸
DepthOfField (DoF) is a photographic effect that blurs parts of the scene based on their distance from the camera. It's excellent for drawing attention to specific elements, creating cinematic shots, or simulating the way human eyes focus.
FarIntensity: How blurry objects far from the FocusRadius become.
FocusRadius: The distance from the camera where objects are perfectly in focus.
InFocusRadius: The range around the FocusRadius where objects remain sharp.
NearIntensity: How blurry objects very close to the camera become (less commonly used for general gameplay).
You can use DepthOfField to:
Make characters or important objects stand out by blurring the background.
Create a cinematic intro or cutscene.
Simulate a camera lens effect for a more realistic feel.
Add a subtle blur to distant scenery, enhancing realism.
e. BlurEffect 💧
A simpler blur effect that applies a uniform blur across the entire screen. While less nuanced than DepthOfField, it's useful for specific purposes.
Size: The intensity of the blur.
You can use BlurEffect for:
Transition screens.
When a player is "dizzy" or "confused."
As a background for UI elements.
4. Light Sources: Illuminating Specific Areas 🔦
While the Lighting service controls the global environment, you'll also need individual light sources placed within your Workspace to illuminate specific areas, highlight objects, or create localized effects. These are found under Part properties or can be inserted directly.
a. PointLight 💡
A PointLight emits light uniformly in all directions from a single point, like a light bulb or a torch.
Range: How far the light reaches.
Brightness: The intensity of the light.
Color: The color of the light.
Shadows: (Boolean) Whether this light casts shadows. Enabling shadows is more performance-intensive but more realistic.
You can use PointLight for:
Lamps, streetlights, candles, or any small, omnidirectional light source.
Creating a soft glow around a magical item.
Illuminating small rooms or corridors.
b. SpotLight 🔦
A SpotLight emits light in a cone shape, like a flashlight or a stage light.
Range: How far the light reaches.
Brightness: The intensity of the light.
Color: The color of the light.
Shadows: (Boolean) Whether this light casts shadows.
Angle: The width of the light cone (in degrees). A smaller angle creates a more focused beam.
Face: The side of the part the spotlight emits from (e.g., Top, Bottom, Front).
You can use SpotLight for:
Car headlights, searchlights, or security cameras.
Stage lighting in a theater.
Creating dramatic, focused beams of light in a dark environment.
c. SurfaceLight 🖥️
A SurfaceLight emits light from one or more faces of a part, like a screen, a window, or a fluorescent light panel.
Range: How far the light reaches.
Brightness: The intensity of the light.
Color: The color of the light.
Shadows: (Boolean) Whether this light casts shadows.
Angle: The spread of the light (similar to a spotlight's angle, but for a surface).
Face: The specific face(s) of the part the light emits from. You can select multiple faces.
You can use SurfaceLight for:
Televisions, computer monitors, or glowing panels.
Windows that glow from within a building.
Long fluorescent lights in a hallway.
Tips for Combining Light Sources:
Layering: Combine a PointLight for general illumination with a SpotLight for a focused beam and a SurfaceLight for a glowing screen in a single room to create rich, layered lighting.
Color Harmony: Use complementary or contrasting colors for different light sources to create visual interest.
Purposeful Placement: Every light should have a reason. Is it illuminating a path? Highlighting an important item? Creating a specific mood?
By mastering these properties and effects, you'll gain unparalleled control over the visual narrative of your game. You'll be able to sculpt light and shadow to guide, immerse, and enchant your players like never before! 🎨✨
Practical Application & Best Practices: Illuminating Your Vision 💡🔧
You've learned about the tools; now let's talk about how to use them effectively and wisely. Implementing great lighting isn't just about cranking up settings; it's about thoughtful design, performance awareness, and continuous iteration.
1. Performance Considerations: The Balance Act ⚖️
This is crucial, especially when you're using Future Is Bright. While stunning visuals are tempting, a laggy game will quickly drive players away.
Limit Light Sources (Especially Shadow-Casting Ones): Every light source, especially those with Shadows enabled, adds to the computational load. You should use them strategically. Do you really need a shadow-casting PointLight in every single lamp, or can some be non-shadow-casting for distant or less important lights?
Optimize Range and Brightness: Don't make lights brighter or range further than necessary. A light with a Range of 100 will calculate light for a much larger area than one with a Range of 20.
Consider Your Target Audience: If your game is designed for a broad audience, including mobile players, you might need to stick with ShadowMap or even Voxel for certain experiences. If you're building a high-fidelity showcase, FiB is great, but be explicit about the recommended hardware.
Use Effects Sparingly (or with care): While BloomEffect and DepthOfField are beautiful, they do consume resources. Don't overdo them. A subtle bloom is often more effective than an overpowering one.
Test on Different Devices: Always test your game on various devices (PC, mobile, tablet) to ensure it runs smoothly with your chosen lighting settings. Roblox Studio's "Test" tab allows you to emulate different devices.
2. Guiding the Player: Light as a Beacon 🗺️
Lighting isn't just aesthetic; it's a powerful gameplay tool. You can use it to:
Highlight Objectives: Make a quest giver or an important item glow slightly, or place a PointLight near it to draw the player's eye.
Indicate Paths: Use a trail of lights to guide players through a maze or a dark forest.
Warn of Danger: A flickering red light might signal an explosion, or a sudden dimming could indicate an approaching threat.
Direct Focus: In a large room, use spotlights to draw attention to specific areas of interest, like a stage or a crucial interactive element.
Think of light as a non-verbal cue that helps players navigate and understand your world. 💡➡️🚶♀️
3. Storytelling with Light: Setting the Scene 🎭
Lighting is a master storyteller. It can instantly communicate the mood, genre, and even the narrative of your game.
Horror: Low Brightness, dark Ambient and OutdoorAmbient, combined with flickering PointLights and a cool TintColor in ColorCorrectionEffect, can create a terrifying atmosphere. Maybe a subtle BlurEffect for a disorienting feel. 👻
Fantasy: Warm, golden SunRaysEffect during the day, with soft BloomEffect on magical elements. At night, a bright moon (achieved with ClockTime) and subtle PointLights from torches. 🧚♀️
Sci-Fi: Cool blue or vibrant neon SurfaceLights, sharp SpotLights, and a strong BloomEffect on futuristic tech. Maybe a slightly desaturated ColorCorrectionEffect for a gritty future. 🤖
Cozy/Home: Warm Ambient light, soft PointLights from lamps, and a subtle warm TintColor from ColorCorrectionEffect. ☕
Before you even start building, consider the emotional tone you want to convey, then think about how lighting can help achieve that.
4. Iterative Design: Experiment, Experiment, Experiment! 🧪
You won't get perfect lighting on your first try. It's an iterative process.
Playtest Constantly: Walk through your game at different times of day (if you have a cycle), observe how light falls on objects, and see if the mood is right.
Adjust Small Increments: Instead of making drastic changes, tweak properties in small steps and observe the impact.
Get Feedback: Ask other developers or players for their opinions. Sometimes, a fresh pair of eyes can spot issues or suggest improvements you missed.
Look at Real-World Inspiration: Pay attention to how light behaves in movies, real-life environments, or even other games. What makes those scenes look good? Can you replicate similar effects in Roblox?
Your lighting journey is a creative one. Don't be afraid to try crazy combinations, push boundaries, and discover what truly makes your game visually unique. The more you experiment, the better you'll become at harnessing the power of light! 🎨🖌️
Spotlight on Success: Front Page Examples You Can Learn From! 🏆
You don't have to reinvent the wheel! Many successful Roblox games have already mastered the art of lighting, and you can learn a tremendous amount by observing their techniques. Here are a few examples of popular games that utilize lighting exceptionally well, and what you can take away from them:
1. Jailbreak: Dynamic Day-Night Cycles & Realism 🚓
Jailbreak is a prime example of how ShadowMap (and now often FiB for many players) with a well-implemented day-night cycle can create a highly immersive open world.
What they do well:
Realistic Time Progression: The sun rises and sets naturally, casting long, dynamic shadows that change throughout the day. This makes the world feel alive and reactive.
Atmospheric Lighting: Sunsets are often vibrant with warm oranges and purples, while nights are dark but still navigable thanks to streetlights and car headlights.
Strategic Light Sources: Streetlights, building interiors, and vehicle lights are placed strategically to ensure visibility and add to the realism, especially at night.
Your takeaway: Focus on making your day-night cycle feel natural. Use ClockTime and consider scripting subtle ColorCorrectionEffect changes (e.g., warmer tint at sunset, cooler at night) to enhance the mood throughout the day. Don't be afraid to make nights truly dark, but provide light sources to guide players.
2. Adopt Me!: Bright, Cheerful, and Inviting 🏡
Adopt Me! is known for its incredibly friendly and inviting aesthetic, and lighting plays a huge role in that.
What they do well:
High Brightness & Warm Ambient: The game uses high overall Brightness and often a warm, slightly yellow or light orange Ambient and OutdoorAmbient to create a perpetually sunny, cheerful atmosphere.
Subtle Bloom: You'll notice a gentle BloomEffect on lights and reflective surfaces, making everything feel soft and slightly magical without being overpowering.
Clear Visibility: Despite the stylized look, everything is clearly visible, which is crucial for a game focused on exploration and interaction.
Your takeaway: If your game aims for a positive, family-friendly, or whimsical vibe, lean into high Brightness, warm ambient colors, and subtle BloomEffects. Ensure your lighting makes your world feel welcoming and easy to navigate.
3. The Wild West: Cinematic Mood & Environmental Storytelling 🤠
The Wild West leverages lighting to evoke the dusty, rugged, and sometimes harsh beauty of its setting.
What they do well:
Strong SunRaysEffect: You'll often see prominent SunRaysEffect during sunrise and sunset, adding a cinematic, almost dusty feel to the vast landscapes.
Dramatic Shadows: With FiB enabled, the long, sharp shadows from cacti, rocks, and buildings create a sense of scale and realism.
Color Correction for Atmosphere: They likely use ColorCorrectionEffect to slightly desaturate colors or add a warm, sepia-like tint, enhancing the classic Western movie feel.
Your takeaway: Consider how SunRaysEffect can add drama and atmosphere to open-world games. Think about using ColorCorrectionEffect to establish a specific film-like or historical aesthetic. Lighting can truly transport players to another time and place.
4. Doors: Master of Horror & Tension 🚪👻
Doors is a fantastic example of how minimal, strategic lighting can create maximum fear and tension.
What they do well:
Extreme Darkness: The game embraces darkness, making players rely on limited light sources (like a flickering lighter or a flashlight). This creates vulnerability and suspense.
PointLights for Jumpscares: Crucial elements or jump scare triggers are often illuminated briefly or subtly by PointLights, drawing the player's eye just before something happens.
Flickering Lights: Lights that flicker or suddenly go out are used to build tension and disorient the player. This is achieved through scripting the Brightness property of PointLights.
Cool/Desaturated ColorCorrection: A cool, desaturated TintColor in ColorCorrectionEffect enhances the eerie, unsettling atmosphere.
Your takeaway: Don't be afraid of darkness! Strategic use of limited light sources can be incredibly effective for horror or mystery games. Scripting light behavior (flickering, dimming) can add dynamic tension.
By studying these games, you'll gain practical insights into how top developers use lighting to achieve their desired effects. Don't just copy; understand why their lighting works, and then adapt those principles to your own unique game! 🕵️♀️
Conclusion: Light Up Your Game! 🎉 | The Ultimate Guide to Roblox Lighting
You've made it! You've journeyed through the fundamentals of Roblox lighting, explored the power of Voxel, ShadowMap, and the breathtaking Future Is Bright, and learned how to manipulate properties and effects to craft any mood imaginable. You've even seen how top-tier games leverage lighting to captivate millions of players.
Remember, lighting is more than just a technical detail; it's an art form. It's the brushstroke that adds depth to your canvas, the melody that sets the tone for your story. It can transform a good game into a truly great one, leaving a lasting impression on everyone who plays it.
So, what are you waiting for? Head into Roblox Studio, open up your Lighting service, and start experimenting! Play with the ClockTime, tweak the Brightness, add a BloomEffect, or switch to Future Is Bright and watch your world come alive. Don't be afraid to try new things, make mistakes, and discover your own unique lighting style.
Your game has incredible potential, and with the power of lighting, you can truly illuminate your vision and create experiences that players will never forget. Go forth and light up the Roblox metaverse! 🚀✨

$50
Product Title
Product Details goes here with the simple product description and more information can be seen by clicking the see more button. Product Details goes here with the simple product description and more information can be seen by clicking the see more button

$50
Product Title
Product Details goes here with the simple product description and more information can be seen by clicking the see more button. Product Details goes here with the simple product description and more information can be seen by clicking the see more button.
$50
Product Title
Product Details goes here with the simple product description and more information can be seen by clicking the see more button. Product Details goes here with the simple product description and more information can be seen by clicking the see more button.


Comments