
🏞️ Roblox Terrain Tutorial: How to Create Realistic Terrain in Roblox Studio
- Primal Cam
- Aug 5, 2025
- 3 min read

🎯 Introduction | How to create realistic terrain in Roblox Studio
If you've ever wondered how popular Roblox games achieve immersive landscapes, from lush forests to vast oceans and dynamic caves—terrain is the secret. Whether you're designing an open-world adventure, battle arena, or simulator, mastering terrain in Roblox Studio unlocks massive creativity and realism.
This guide shows you how to create realistic terrain in Roblox Studio, combining tools, plugins, scripting, and design tips to build optimized, beautiful environments.
🧰 What Is Roblox Terrain?
Roblox terrain is a voxel-based system that lets you sculpt environments with materials like grass, sand, water, and rock. It's far more efficient than using parts (Blocks, Wedges) and can handle large, seamless worlds.
✅ Benefits of Using Terrain:
Efficient rendering (voxel engine)
Optimized for performance
Visually dynamic (supports lighting, shadows, water effects)
Faster world building
Scalable across devices
🛠️ Getting Started with Terrain in Roblox Studio
1. Open the Terrain Editor
Steps:
Open Roblox Studio
Go to the "Home" or "Model" tab
Click Terrain Editor
The terrain editor includes four main tools:
Add – Paints terrain into the world
Subtract – Removes terrain
Grow/Shrink – Morphs existing terrain
Smooth – Blends sharp terrain edges
🌎 Creating Your First Terrain Map
Let’s build a basic terrain layout step by step.
Step 1: Generate Template Terrain
Open Terrain Editor > Create tab
Choose a base: Hills, Canyons, Mountains, Flatlands, Coastal
Click "Generate"
This gives you a terrain canvas to modify.
Step 2: Use Add/Subtract
Use Add to place terrain: Grass, Rock, Sand, Water
Adjust Brush Size, Shape, Strength for control
Use Subtract to carve caves or valleys
Step 3: Smooth & Sculpt
Use Smooth to blend terrain
Switch to Grow/Shrink for shaping hills and slopes
Step 4: Apply Materials
Select a material (Mud, Ice, Asphalt, Lava, etc.)
Paint it using the Material tool
🏞️ Realistic Terrain Design Principles
1. Elevation Matters
Avoid flat landscapes. Mix hills, cliffs, plateaus, and valleys.
2. Blend Materials
Avoid solid patches. Use gradients: Grass > Dirt > Rock.
3. Use Biomes
Create zones: forest, desert, beach, snow, mountains.
4. Lighting + Color Correction
Use Lighting > ColorCorrection & Atmosphere to add mood.
5. Add Nature Props
Use trees, rocks, grass, fog, clouds, and animals to bring terrain to life.
📦 Plugins That Improve Terrain Creation
🌲 Realism Plugins:
Archimedes Two – Curved terrain paths
Terrain Brush++ – Custom brush presets
GapFill – Smooths terrain borders
📐 Efficiency Plugins:
F3X Terrain Tools – Advanced tools for large edits
PartToTerrain – Convert parts into terrain
🔁 Optimization Plugins:
Simple Terrain Optimizer – Reduces terrain voxel load
Zoning Plugin – Labels areas for scripts (biomes, spawn zones)
🔧 How to Script Terrain Changes in Real Time
Use Roblox’s Terrain API to modify environments during gameplay.
Example: Raise a Hill with Code
local terrain = workspace.Terrain
terrain:FillBall(Vector3.new(0, 10, 0), 10, Enum.Material.Grass)
Example: Dig a Hole
terrain:FillBall(Vector3.new(0, 10, 0), 10, Enum.Material.Air)
Example: Paint Terrain Material
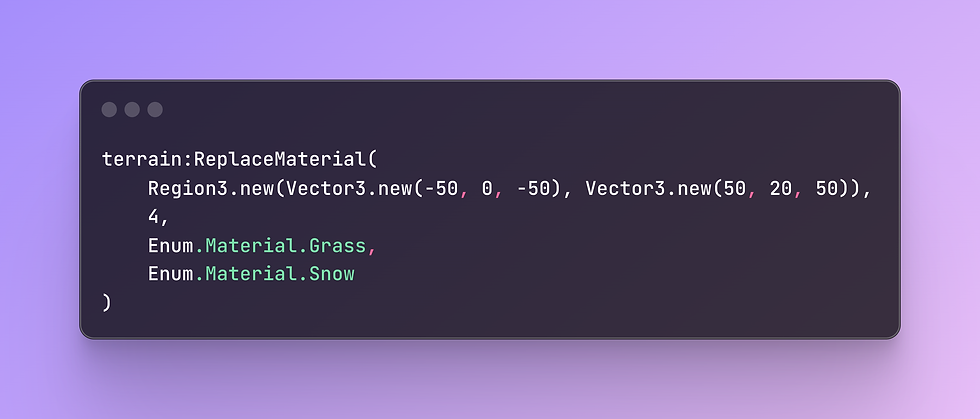
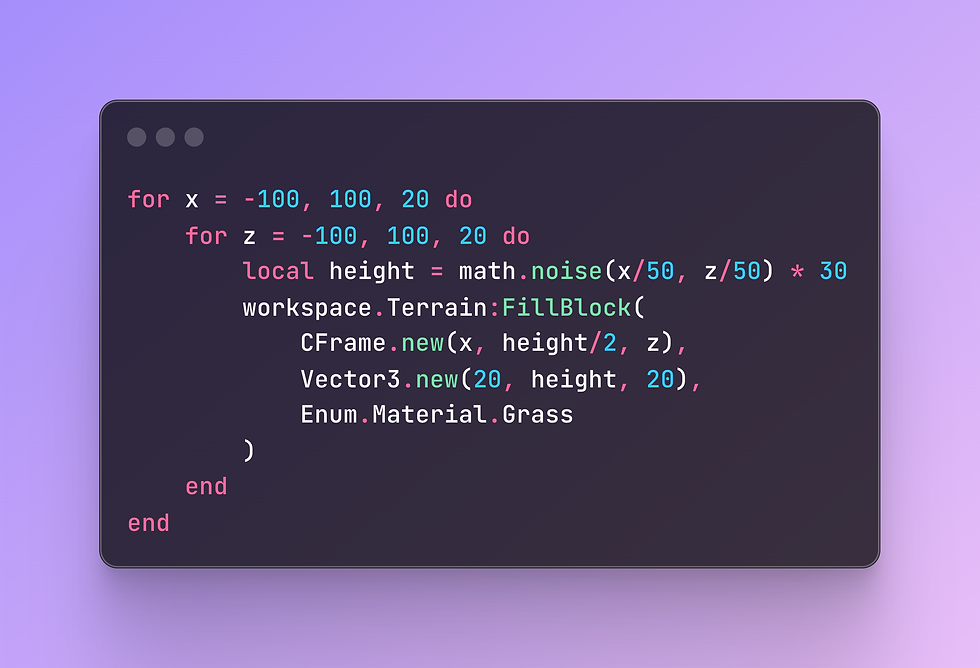
Example: Procedural Terrain Generator
🌐 Multiplayer Terrain Tips
✅ Best Practices:
Never modify terrain from LocalScripts (server-only)
Use RemoteEvents to request terrain changes
Cache terrain data to avoid excessive modification
Avoid changing terrain every frame (lag risk)
💡 Terrain Use Cases by Game Type
🎮 Adventure Game
Custom biomes, hidden caves
Procedural map expansion
🛡️ Battle Royale
High-ground cliffs and cover
Storm shrinking terrain
🐾 Pet Simulators
Layered farming fields, mountain mining
Water zones for fishing systems
🧱 Obby Games
Natural platforms using floating terrain
🧠 Terrain Performance Optimization
⚙️ Reduce Voxels:
Use fewer large features, not tons of tiny terrain shapes
Delete terrain far from players
📏 Limit Heightmaps:
Max size: 2048x2048
Use lower-resolution PNGs for better memory
🚫 Avoid Water Loops:
Avoid terrain intersecting multiple water types (it tanks FPS)
🔄 Use StreamingEnabled:
Stream terrain chunks based on player proximity
Improves mobile/console performance
game:GetService("Workspace").StreamingEnabled = true
🧭 Advanced Terrain Features
1. Import Terrain Heightmaps
Design map in external app (Gaea, WorldMachine, Photoshop)
Export grayscale heightmap
Use Terrain Editor > Import > PNG
2. Terrain Water Physics
Roblox water terrain has buoyancy, flow, and reflection
Use it for lakes, oceans, rivers
Add invisible collision if needed (avoid glitches)
3. Dynamic Terrain Scripts
Lava rising systems
Terrain breaking under player
Day-night terrain swapping
📊 SEO Summary Table
Feature | Tool/Script/Method |
Generate Base Terrain | Terrain Editor > Create tab |
Paint/Shape Terrain | Add, Subtract, Grow, Smooth tools |
Realistic Design | Biomes, Material blending, Elevation |
Procedural Terrain Script | FillBlock() + math.noise |
Terrain Editor Plugins | Terrain Brush++, F3X, Archimedes Two |
Terrain Optimization | StreamingEnabled, Optimizer Plugins |
Multiplayer Safe Terrain | Server Scripts + RemoteEvents |
✅ Conclusion
Mastering terrain creation in Roblox Studio makes your games immersive, performant, and visually unforgettable. Whether you’re building a fishing sim, battle royale, or survival RPG, the ability to create realistic landscapes gives your game next-level polish.
Now that you know how to create realistic terrain in Roblox Studio—go build something that feels alive. 🌍
Want plug-and-play terrain systems or a full starter map?👉 Shop Now at PrimalCam.com

$50
Product Title
Product Details goes here with the simple product description and more information can be seen by clicking the see more button. Product Details goes here with the simple product description and more information can be seen by clicking the see more button

$50
Product Title
Product Details goes here with the simple product description and more information can be seen by clicking the see more button. Product Details goes here with the simple product description and more information can be seen by clicking the see more button.
$50
Product Title
Product Details goes here with the simple product description and more information can be seen by clicking the see more button. Product Details goes here with the simple product description and more information can be seen by clicking the see more button.


Comments