
🎮 Why You Should Use ContextActionService Over UserInputService in Roblox
- Primal Cam
- Sep 28, 2025
- 4 min read

Hey there, Roblox devs 👋! If you’ve ever worked on making controls for your Roblox games, you’ve probably stumbled upon UserInputService (UIS). It’s one of the go-to services for handling input like key presses, mouse clicks, or gamepad buttons.
But here’s the thing: while UIS is powerful, it’s not always the best tool for every job. For many cases—especially when you want smoother, more flexible, and player-friendly controls—ContextActionService (CAS) is the MVP 🏆.
Today, I’ll walk you through why ContextActionService shines over UserInputService, when to use it, and how it can make your life as a developer so much easier. 🚀
🕹 First, What’s UserInputService?
Imagine UIS as the raw input handler. It listens to everything the player does:
When they press WASD ⌨️
When they click the mouse 🖱️
When they tap the screen 📱
When they move the joystick 🎮
It’s like a big net catching every single action. That’s awesome… but sometimes it’s too raw. You end up writing a lot of code just to make sure those inputs behave correctly across different devices.
🌟 Enter ContextActionService
Now let’s talk about ContextActionService (CAS). Think of it as UIS’s smarter sibling 🤓. Instead of just catching input, CAS lets you:
Bind specific actions to inputs (like “Jump,” “Crouch,” “Reload”).
Automatically adapt controls to different devices (keyboard, touch, gamepad).
Easily disable or enable actions depending on the situation (like disabling “Attack” during a cutscene 🎬).
Give players on mobile auto-generated buttons without you coding them yourself! 📱✨
In short, CAS focuses on what the player is trying to do (the action), not just which key they pressed.
⚖️ CAS vs. UIS – The Big Differences
Let’s break it down:
Feature | UserInputService (UIS) | ContextActionService (CAS) |
Raw Input | ✅ Yes, everything | ❌ No, only bound actions |
Easy to Create Actions | ❌ You code it manually | ✅ Built-in |
Device Adaptation | ❌ Manual setup | ✅ Automatic |
Mobile Buttons | ❌ You must design UI | ✅ CAS generates them |
Enabling/Disabling Controls | ❌ Custom logic required | ✅ Built-in |
Focus on Actions | ❌ No | ✅ Yes |
So, CAS is basically more specialized and convenient when you care about gameplay actions. UIS is best when you need super low-level control.
📱 Why CAS Is a Lifesaver on Mobile
Let’s be real: a lot of Roblox players are on mobile 📲. Writing your own buttons for mobile controls can be… painful.
With UIS, you’d need to:
Make your own buttons in ScreenGui 🖼️
Script each button to behave like the keyboard controls
Test endlessly to make sure they line up
😩 Ugh. That’s a lot.
But CAS? One line of code can give mobile players a touch button automatically. Like this:
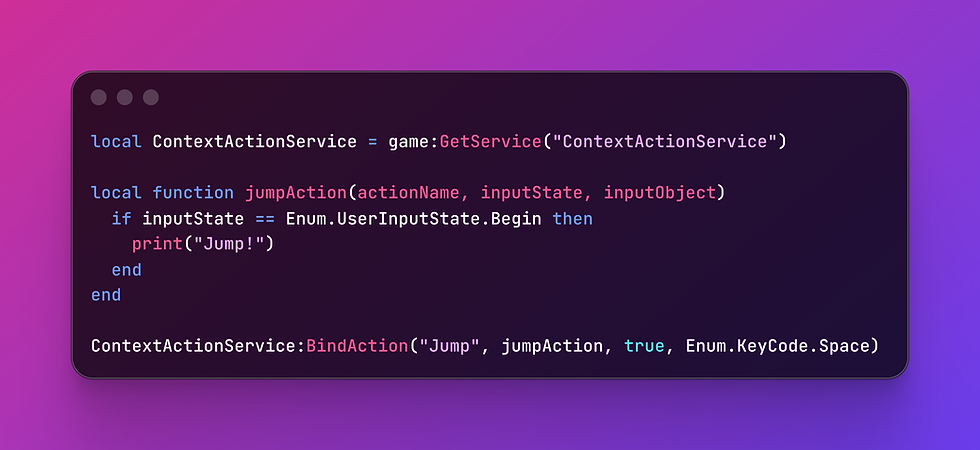
BOOM 💥. Now mobile players see a jump button, PC players use the spacebar, and gamepad players use the right button—all without you writing three different systems. That’s the power of CAS.
🎮 Cleaner Code with CAS
Here’s what usually happens with UIS:
You connect to InputBegan.
You check which key was pressed.
You check what the player is doing.
You add if/else chains that grow longer than your grocery list. 🧾
CAS, on the other hand, is neat and tidy:
You bind an action with a name (like "Sprint").
You assign which keys/buttons trigger it.
You can enable/disable it as needed.
It makes your code more readable, scalable, and easier to debug.
🔄 Switching Actions On and Off
Another underrated feature: CAS can easily toggle actions.
Example: Let’s say you want players to crouch 🤏, but only when they’re not swimming 🏊. With UIS, you’d need a bunch of checks. With CAS:
-- Enable crouch
ContextActionService:BindAction("Crouch", crouchFunction, true, Enum.KeyCode.C)

-- Disable crouch
ContextActionService:UnbindAction("Crouch")
That’s it! You can bind or unbind at any time, giving you full control over player states.
🎨 A Real-World Example: Adventure Game
Imagine you’re making an adventure game 🌍. You want the player to:
Jump (Space or mobile button)
Attack (Left Mouse or a gamepad button)
Open Inventory (Tab or mobile button)
With UIS, you’d be juggling multiple input checks across devices. With CAS:
local CAS = game:GetService("ContextActionService")

local function attack(actionName, inputState, inputObject)
	if inputState == Enum.UserInputState.Begin then
		print("Attack triggered!")
	end
end

CAS:BindAction("Attack", attack, true, Enum.UserInputType.MouseButton1, Enum.KeyCode.ButtonR2)
Guess what? Players on PC, mobile, AND console are all covered with one function 🎉.
🛠 When to Still Use UIS
Don’t get me wrong—UIS isn’t useless. Sometimes you do want raw input. For example:
Detecting when the mouse moves 🎯
Custom gestures on mobile 🖐️
Key combinations like Shift + W for sprinting
In those cases, UIS gives you the fine-grained control you need.
But when it comes to actual game actions, CAS is usually the smarter choice.
🚀 Final Thoughts
If you’re still writing all your input code with UserInputService, I’ve got good news: switching to ContextActionService will make your life easier, your code cleaner, and your players happier. 🎉
Here’s the quick takeaway:
Use UserInputService when you need raw, low-level input.
Use ContextActionService when you want to bind actions across devices, add mobile buttons easily, and keep your code clean.
So next time you’re working on controls, think actions, not keys. CAS is all about designing for the player’s experience ❤️.
✨ Pro Tip | ContextActionService Roblox
Try starting your next project with CAS from the beginning. You’ll avoid messy refactors later and be amazed at how smooth things run. Plus, your mobile players will silently thank you every time they see those handy auto-buttons 🙏📱. (ContextActionService Roblox)
Happy scripting, and may your controls always feel buttery smooth! 🧈🎮

$50
Product Title
Product Details goes here with the simple product description and more information can be seen by clicking the see more button. Product Details goes here with the simple product description and more information can be seen by clicking the see more button

$50
Product Title
Product Details goes here with the simple product description and more information can be seen by clicking the see more button. Product Details goes here with the simple product description and more information can be seen by clicking the see more button.
$50
Product Title
Product Details goes here with the simple product description and more information can be seen by clicking the see more button. Product Details goes here with the simple product description and more information can be seen by clicking the see more button.


Comments