
The Ultimate Guide to CFrames in Roblox Studio: Become a CFrame Master! 🚀
- Primal Cam
- Aug 6, 2025
- 8 min read

Hey there, future game developer!
👋 Have you ever wondered how things move so smoothly in your favorite Roblox games? How a door swings open perfectly, a car drives around a city, or how your character can do an awesome parkour move? The secret behind a lot of this magic is something called a CFrame.
It might sound like a weird, technical word, but don't worry! This guide is here to break it all down for you in a super simple and fun way. We're going to go on an adventure to understand what CFrames are, how you can use them to build amazing things in Roblox Studio, and even look at how top games use them. By the end of this, you'll be a CFrame wiz! 🧙♂️
What in the World is a CFrame? 🤔
Imagine you have a toy car. You can put it anywhere in your room, right? That's its position. You can also turn it to face any direction. That's its orientation or rotation. A CFrame, which is short for Coordinate Frame, is like a super tool in Roblox that holds both the position and the orientation of an object all in one! 🎁
Think of it like this:
Vector3 (Position): This is like knowing the address of your friend's house. It tells you where something is in the 3D world of your game (the X, Y, and Z coordinates). But it doesn't tell you which way the front door is facing.
CFrame: This is like having the address AND a picture of your friend's house from the front. You know exactly where it is and which way it's facing. So you can not only go to the house but also know how to walk in through the front door.
So, a CFrame gives you the full picture of an object's place and direction in the 3D world. This is super important for making things move and rotate just the way you want them to.
CFrame vs. Vector3: The Ultimate Showdown! 🥊
Let's make this even clearer with a fun analogy.
Imagine you're a superhero, and you want to fly to a specific spot in the city.
Using a Vector3 is like using a teleporter that only knows coordinates. You can instantly appear at the top of a building, but you might be facing the wrong way, or even be upside down! You'd have to spin around to get your bearings.
Using a CFrame is like having a super-advanced flight system. You not only arrive at the exact spot but you land perfectly, facing the direction you want, ready for action!
Here’s a quick table to show you the difference:
Feature | Vector3 | CFrame |
What it holds | Just position (X, Y, Z) | Position AND rotation |
Analogy | A dot on a map | A dot on a map with an arrow showing direction |
Good for | Knowing where something is | Knowing where something is AND how it's oriented |
Moving things | Can move things, but rotation is separate | Moves and rotates things together smoothly |
So, while Vector3 is useful for just knowing a location, CFrame is the real MVP when you want to control both position and rotation, which is most of the time in game development!
Let's Get Our Hands Dirty: Using CFrames in Roblox Studio! 💻
Enough talk, let's start building! We're going to jump into Roblox Studio and see how you can use CFrames to move and rotate parts.
Creating a New CFrame
First, let's learn how to create a CFrame. You can think of this like telling a part exactly where to go and how to face.
There are a few ways to do this, but we'll start with the most common one: CFrame.new().
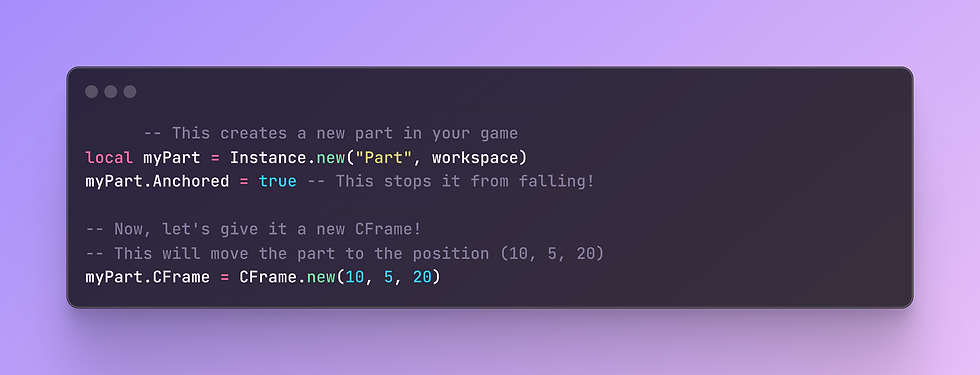
In this code, we're creating a new part and then setting its CFrame property. The CFrame.new(10, 5, 20) tells the part to go to the X coordinate of 10, the Y coordinate of 5 (which is up), and the Z coordinate of 20.
Moving a Part with CFrame
Now, what if you want to move a part from where it already is? This is where the fun begins! You can add a Vector3 to a CFrame to move it.
Imagine your part is a toy car, and you want to move it 5 studs forward.

In this example, we're taking the part's current CFrame and adding a Vector3 of (0, 5, 0). This tells the part to stay in the same X and Z position but move 5 studs up on the Y-axis. It's like giving your part a little jump! 🤸♀️
Here's a cool trick: if you want to move the part in the direction it's facing, you can use its own LookVector. The LookVector is a special Vector3 that always points forward from the front face of the part.
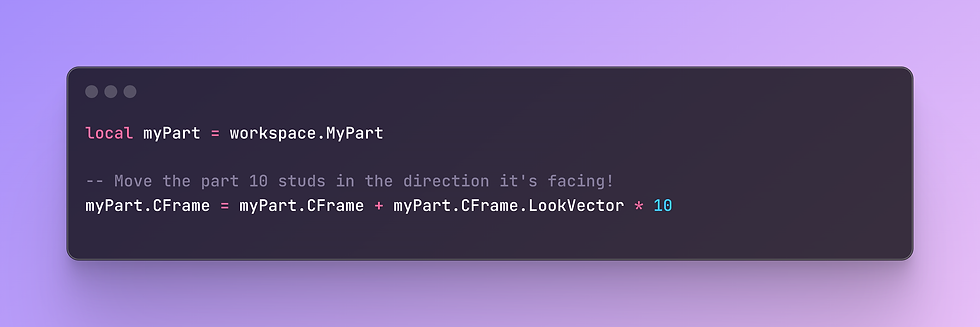
This is super useful for making things like cars, planes, or even just making your character walk forward!
Rotating a Part with CFrame
Now for the really cool part: rotation!
🌀 To rotate a part, we use CFrame.Angles(). This lets you set the rotation in degrees, but we have to use a little helper called math.rad() to convert our degrees into something called radians, which is what computers like to use for angles.
Let's say you want to rotate a part 45 degrees.

We're multiplying the part's current CFrame by a new rotational CFrame. Think of it like this: the * symbol is like saying "and then rotate it by this much."
You can play around with the numbers in CFrame.Angles() to rotate on different axes:
The first number is for the X-axis (pitch, like a plane going up or down).
The second number is for the Y-axis (yaw, like a car turning left or right).
The third number is for the Z-axis (roll, like a plane doing a barrel roll).
Use Cases: Where the CFrame Magic Happens! ✨
Now that you know the basics, let's look at some awesome things you can build with CFrames.
Moving Platforms: You know those moving platforms in obbies that you have to jump on? Those are often made with CFrames! A script can continuously update the platform's CFrame to move it back and forth or in a circle. So you can create tricky jumps for players.
Custom Doors: You can create a door that swings open realistically. When a player touches a button, you can use CFrames to rotate the door around its hinge.
Elevators: An elevator is just a platform that moves up and down. You can use CFrames to smoothly move the elevator between floors.
Custom Cameras: Have you ever played a game where the camera does something cool, like a cinematic cutscene or a top-down view? That's all done with CFrames! You can set the Camera's CFrame to position and orient it anywhere you want.
Making Things Look at Other Things: This is a super powerful use of CFrames. You can make a turret always point at a player, or make a sunflower always face the sun. You can do this with CFrame.lookAt().
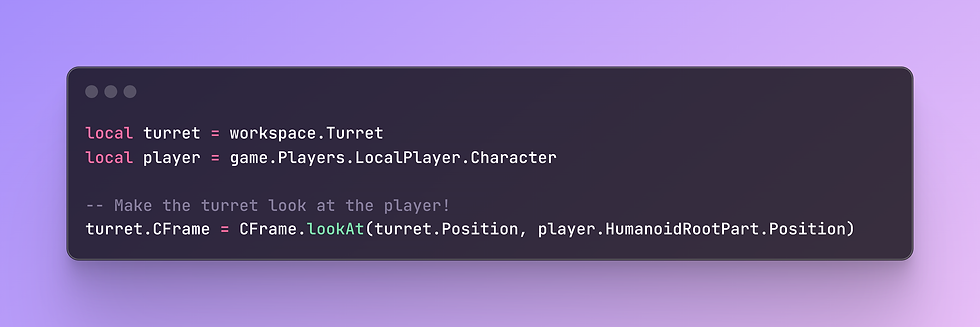
This one line of code will make the turret's front face always point towards the player's character. How cool is that?!
Top Roblox Game Examples: CFrames in the Wild! 🦁
Let's take a look at how some of the most popular Roblox games use CFrames to create their amazing experiences.
Jailbreak: The Moving Train 🚂
Have you ever ridden the train in Jailbreak? It moves smoothly along the tracks, and you can even walk around on it while it's moving! This is a perfect example of CFrames at work.[1][2]
The developers of Jailbreak use CFrames to update the position and orientation of the train every single frame.[2] This makes the train follow the tracks perfectly. And to keep your character from falling off, the game also updates your character's CFrame to match the train's movement.[1][2] It's like you're "stuck" to the train with CFrame magic!
Phantom Forces: Realistic Bullet Physics 🔫
In a fast-paced shooter game like Phantom Forces, how do the bullets work? They don't just instantly hit where you're aiming. They have travel time and even drop over long distances. This is all calculated using raycasting and CFrames.[3][4]
When you fire a gun, the game creates a "ray" (an invisible line) that starts from your camera's CFrame and points in the direction you're aiming.[4][5] The game then uses this information to calculate the bullet's path, including how it's affected by gravity. This makes the shooting feel much more realistic.
Piggy: Custom Characters and Animations 🐷
In Piggy, the custom characters like Piggy, Doggy, and others don't move like standard Roblox characters. They have their own unique animations and movements. This is achieved by manipulating the CFrames of their body parts.[6][7][8]
The animators and scripters create custom animations by defining the CFrame of each limb at different points in time.[6] This allows for the spooky and sometimes funny movements that make Piggy so unique.
Fun Analogies to Help You Remember 💡
Learning new things is always easier with some fun analogies. Here are a few more to help you master CFrames:
CFrame is like a GPS on steroids: A regular GPS (like Vector3) tells you where to go. But a CFrame GPS also tells your car which way to park when you get there!
CFrame.new() is like teleporting: You instantly appear at a new location.
CFrame.Angles() is like doing a dance move: You're spinning and turning in place.
CFrame * CFrame is like doing a combo move: You're moving and then turning, or turning and then moving. The order matters!
LookVector is like your superhero vision: It always shows you what's directly in front of you.
Let's Get Advanced: Cool CFrame Tricks 🚀
Once you've mastered the basics, you can start doing some really cool things with CFrames.
Creating a Spinning Part
Want to make a part that spins forever? You can use a while loop to continuously update its CFrame.

This code will make the spinningPart rotate by 1 degree on the Y-axis every 0.01 seconds, creating a smooth spinning motion. So you can create cool decorative elements for your game!
Making a Part Orbit Another Part
You can even make a part orbit around another part, like a planet around the sun! ☀️

This code uses a bit of math (don't worry if it looks complicated!) to calculate the position of the planet in a circle around the sun. So you can create your own solar system or other cool orbiting objects!
CFrame Cheat Sheet 📝
Here's a handy table with some of the most common CFrame functions and what they do. You can use this as a quick reference when you're scripting.
CFrame Function | What it Does | Example |
CFrame.new(x, y, z) | Creates a new CFrame at a specific position.[9] | CFrame.new(0, 10, 0) |
CFrame.Angles(rx, ry, rz) | Creates a new CFrame with a specific rotation (in radians).[9] | CFrame.Angles(0, math.rad(90), 0) |
CFrame.lookAt(at, lookAt) | Creates a CFrame at a position that is looking at another position.[9] | CFrame.lookAt(part1.Position, part2.Position) |
CFrame * CFrame | Combines the position and rotation of two CFrames.[9] | part.CFrame = part.CFrame * CFrame.Angles(0, math.rad(10), 0) |
CFrame + Vector3 | Moves a CFrame by a certain amount.[9] | part.CFrame = part.CFrame + Vector3.new(0, 5, 0) |
CFrame.LookVector | A Vector3 that points in the direction the CFrame is facing.[9] | part.CFrame.LookVector |
CFrame.RightVector | A Vector3 that points to the right of the CFrame.[9] | part.CFrame.RightVector |
CFrame.UpVector | A Vector3 that points up from the CFrame.[9] | part.CFrame.UpVector |
You're on Your Way to Becoming a CFrame Pro! 🏆
Wow, you've learned so much about CFrames today! You now know what they are, how they're different from Vector3s, and how to use them to move and rotate parts in your Roblox games. You've also seen how top games like Jailbreak, Phantom Forces, and Piggy use CFrames to create their awesome gameplay.
The most important thing to remember is to have fun and experiment! The more you play around with CFrames in Roblox Studio, the more comfortable you'll become with them. Start with simple things, like making a part move back and forth, and then try more complex things, like creating a custom camera system.
So what are you waiting for? Open up Roblox Studio and start building something amazing with CFrames! You've got this! 💪🚀

$50
Product Title
Product Details goes here with the simple product description and more information can be seen by clicking the see more button. Product Details goes here with the simple product description and more information can be seen by clicking the see more button

$50
Product Title
Product Details goes here with the simple product description and more information can be seen by clicking the see more button. Product Details goes here with the simple product description and more information can be seen by clicking the see more button.
$50
Product Title
Product Details goes here with the simple product description and more information can be seen by clicking the see more button. Product Details goes here with the simple product description and more information can be seen by clicking the see more button.


Comments