
🛠️ How to Create Tools in Roblox – Step-by-Step Guide | Create tools in Roblox
- Primal Cam
- Aug 11, 2025
- 2 min read

Roblox tools are one of the most versatile ways to give players interactive items in your game – from swords and pickaxes to magic wands and grappling hooks. Whether you’re building an adventure game or a simulator, tools can add massive depth to your gameplay.
In this tutorial, we’ll walk through how to create your own tools in Roblox Studio, script them, and customize them for your game.
1️⃣ What is a Tool in Roblox?
A Tool in Roblox is a special object that players can equip and use. They live in the StarterPack so that when a player joins, the tool automatically appears in their inventory.
Tools can:
Perform actions (attack, collect, mine, etc.)
Trigger animations and sounds
Fire RemoteEvents to the server
Interact with the environment
2️⃣ Creating Your First Tool
Step 1 – Open Roblox Studio
Launch Roblox Studio and open your game or create a new baseplate.
Step 2 – Insert a Tool
In Explorer, right-click StarterPack → Insert Object → Tool.
Rename the Tool to something descriptive, e.g., Sword, Pickaxe, or MagicWand.
Step 3 – Add a Handle
Every tool needs a Handle part for the player to hold.
Right-click your tool → Insert Object → Part.
Rename it to Handle (case-sensitive).
Resize and shape it as you like.
Add a Mesh or texture to make it look better.
3️⃣ Scripting Your Tool
Now we’ll add basic functionality so the tool does something when clicked.
Right-click the Tool → Insert Object → LocalScript (for client-side behavior).
Paste in a basic script:

This will print a message in the Output when the tool is activated.
4️⃣ Adding Server-Side Logic
If you want your tool to affect the game world (damage enemies, spawn objects, etc.), you need a Script inside the tool.
Example: Sword damage system
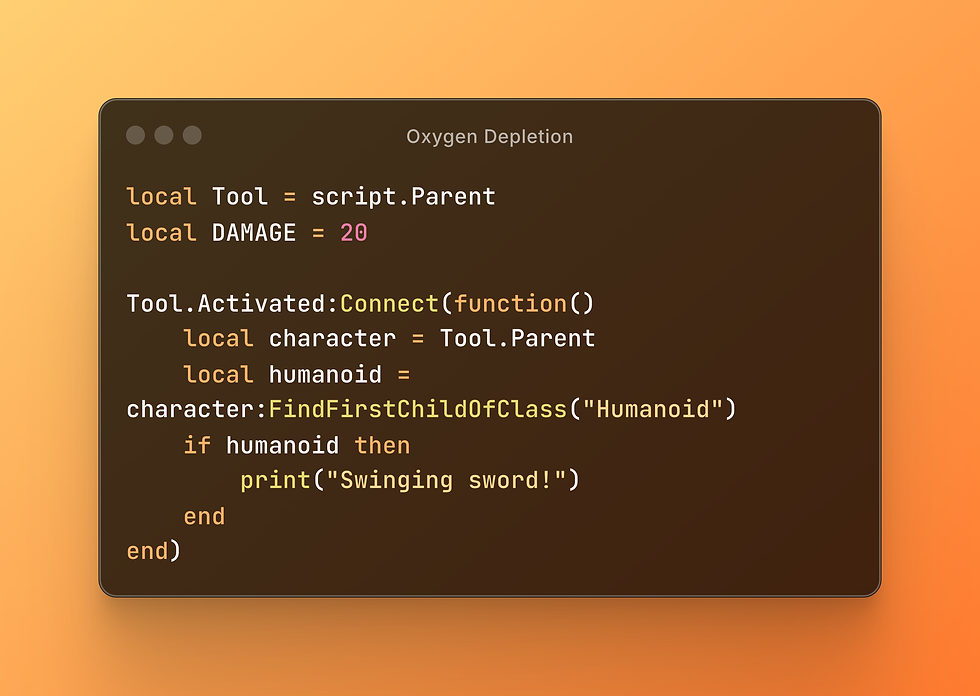
You can combine this with Touched events to deal damage when the sword handle hits an enemy.
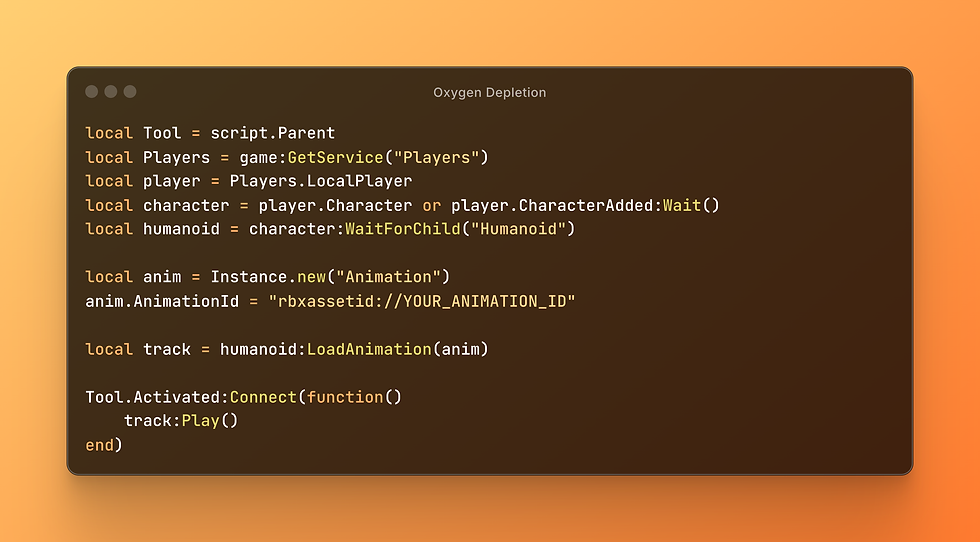
5️⃣ Adding Animations & Sounds
Animations make tools feel alive.
Create an animation in the Animation Editor.
Upload it and get the animation ID.
In your LocalScript, load and play the animation when the tool activates.
Example:
For sounds, insert a Sound object into the Handle and play it inside Tool.Activated.
6️⃣ Customizing Your Tool
MeshPart Handles: Import Blender or Meshy.ai models for more detailed designs.
Particle Effects: Add sparkle or smoke effects when the tool is used.
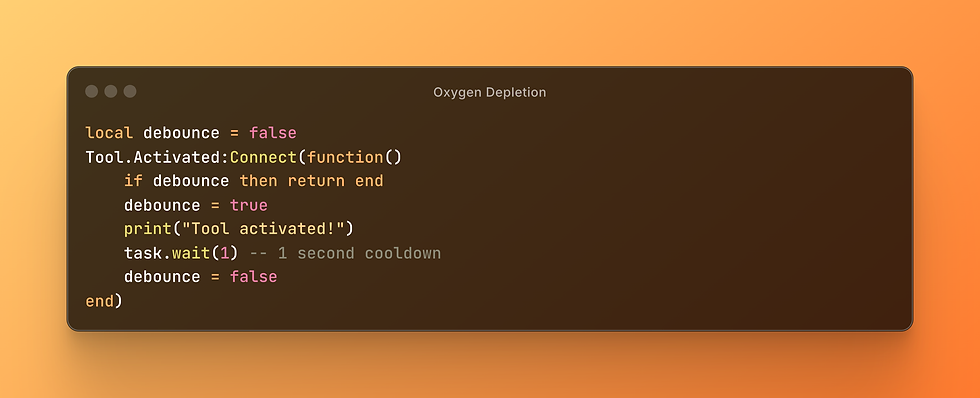
Cooldowns: Prevent spamming by adding a short wait between activations.
Example cooldown:
7️⃣ Testing Your Tool
Click Play in Roblox Studio and test equipping/using your tool. Check Output for errors and make adjustments.
Tip: Use Team Test to ensure your tool works correctly in multiplayer.
✅ Final Tips for Better Tools | Create tools in Roblox
Use RemoteEvents for secure server communication.
Keep damage and important logic server-side to prevent exploits.
Always name the Handle correctly (Handle with capital H) or the tool won’t work.
Organize your scripts and effects for easy editing.
Now you have the basics of creating tools in Roblox! From here, you can expand into more advanced systems like dual-wielding, ranged weapons, or ability tools. (create tools in Roblox)
📺 Watch the full tutorial video here: https://youtu.be/CmaN6JxpDfs?si=CBLzTOAyr0Nxh_Nr

$50
Product Title
Product Details goes here with the simple product description and more information can be seen by clicking the see more button. Product Details goes here with the simple product description and more information can be seen by clicking the see more button

$50
Product Title
Product Details goes here with the simple product description and more information can be seen by clicking the see more button. Product Details goes here with the simple product description and more information can be seen by clicking the see more button.
$50
Product Title
Product Details goes here with the simple product description and more information can be seen by clicking the see more button. Product Details goes here with the simple product description and more information can be seen by clicking the see more button.


Comments